“In the Future Everyone will be famous for 15 minutes”
-Andy Warhol 1968“On the Web, everyone will be famous to fifteen people”
-David Weinberger* 2002The Class Blog
This is the class blog. All lessons, homework, readings, and resources for the class will be posted through this blog. All of you will be required to register on the blog, and I will use the email address that you sign up with to communicate with you outside of the class. I will also place comments to your work on this blog. Please take note of the address now!
You will be required to log into the class blog each class. Open up PHOTOBOOTH on your Mac and take a close up photo of yourself. Please create a gravatar account and upload your image so that your image will be posted with each of your comments. Use you YORK email address to create the account. For the account name, use your full first and last name.
Your Personal Blog
You will post all homework on your personal blog. This is a blog you create specifically for this class. Go to WordPress and create your blog. For your blog address as well as your username, use your full name. Example, johnbrown.wordpress.com. It’s as easy as that! Please take note of the address now!
You will be required to post all your homeword on your personal blog before the start of each class. When you log into the CLASS BLOG for each class, write the url of your homework that you created on your PERSONAL BLOG.
Del.icio.us
Del.icio.us is a social bookmarking service that everyone is required to sign up for an account for an maintain tags on it. Through del.icio.us you are going to “tag” pages related to our work in the class so that you can reference them later and share them with the class. It is a way to keep all your tagged pages in an orderly manner making it very easy for you to find your tagged pages.
Sign up for an account here: http://del.icio.us/
W3 SCHOOLS
This is a great resource site, I’m going to be referring to it a lot this class and in the future. If you are ever stuck for how to do something, start here:
http://w3schools.com
FILE NAMING CONVENTIONS AND INDEX.HTML
There are a few rules that govern the naming of web files and directories:
All Web page files must end with .html or .htm. These extensions are interchangable, but generally we use .html
Names are case sensitive. This means that Bio.html and bio.html will be considered by the server as two different files.
Spaces and non-alphanumeric characters are not allowed, with the exception of underscore (_) and hyphen (-)
The “home” page of a Web site is always called index.html or index.htm. If this file does not exist, you will either get an error or see a directory listing of the root directory, depending on how the Web server is configured.
My suggestion to all of you is that you come up with a naming convention for yourself now, and stick to it. This will avoid a lot of problems later on! For example, my naming convention is to use all lowercase letters, and to use underscores instead of spaces:
my_name.html
CHOOSING A WEB HOST PROVIDER AND DOMAIN NAME
To take your website live you’ll need a web host provider and a domain name. There are hundreds of web host providers that offer a variety of services. CNET lists best practices for choosing a website host provider and it’s worth a few minutes to read it. Bluehost, GoDaddy and Hostmonster are just a few. I highly recommend BLUEHOST. Their control panel is very easy to use and understand. Their $5.95/month price is extremely reasonable, they give you a free domain registration and have a money back guarantee.
You are required to sign up for a website host provider.
MANAGE YOUR SITE: REMOTE VS. LOCAL FILE SYSTEMS
When we build a Web site, we develop them on our local (or “desktop”) machine, and publish them to a remote “Web server”. A Web server is a computer that is essentially the same as your desktop machine, but has server software installed that allows it to take http requests from an internet user’s computer (or “client”), and deliver the requested html document to the user’s browser. This client / server relationship is the basis of all Web activity.
What we call a “site” is really just a collection of html documents that we associate via internal references (links) between them. In order to keep your site organized, and to ensure that it functions exactly the same online as on your desktop, you must keep the file and directory structure exactly the same on the local and remote machines.
The first step in doing this is to organize your local file structure. First, create a “root” folder on your local machine or flash drive from which you are going to work. This folder could be named for the course (web design 1) or your username (najlahhicks). It doesn’t matter what the name is at the top level.
For the beginning of this class, I’m going to dictate a file structure that I want you all to use.
Within your root directory, create two directories:
working_files
public_html
From now on, the “working_files” directory will hold documents and images that you use as resource files for building your site, but not any files that will uploaded to the site itself. Put the resume text file that you brought today into this directory.
The public_html directory will contain all files that will actually become part of your site. Put the bio html file that you created as homework in that directory now.
Within the html directory, also create a subdirectory called:
images
We will use this directory later in the course to store any images that will appear in your web site.
UPLOADING YOUR FILES USING FTP/SFTP
Your html files are uploaded to the Web server using FTP, or File Transfer Protocol. You will need an FTP client to do this. If you are using the A server, you will need a program that supports SFTP, or Secure File Transfer Protocol. Here are likes to some popular programs:
Fugu (MAC) – This program is free.
Fetch (MAC)
CyberDuck (MAC) – This program is free.
FileZilla (PC) – This program is free.
All these programs function essentially the same. To connect to your remote server, you enter the address of the FTP server, your username and password.
Intro to HTML
HTML is the language of Web browsers. HTML stands for HyperText Markup Language. HTML is a simple scripting language originally designed to allow nonlinear navigation of large text documents. It is constantly undergoing revision and evolution to meet the demands and requirements of the growing Internet audience under the direction of theW3Schools, the organization charged with designing and maintaining the language.
HyperText is the method by which you move around on the web. Clicking on specially coded text called hyperlinks navigates you to other pages. The term hyper indicates that the hierarchy of the pages is not linear — i.e. you can go to any place on the Internet whenever you want by clicking on links — there is no set order to do things in. Markup refers to HTML “does”.
HTML Syntax
All HTML syntax is composed of discreet pieces of code called elements. Elements are made up of paired opening and closing tags.
FILE NAMING CONVENTIONS AND INDEX.HTML
There are a few rules that govern the naming of web files and directories:
All Web page files must end with .html or .htm. These extensions are interchangable, but generally we use .html
Names are case sensitive. This means that Bio.html and bio.html will be considered by the server as two different files.
Spaces and non-alphanumeric characters are not allowed, with the exception of underscore (_) and hyphen (-)
The “home” page of a Web site is always called index.html or index.htm. If this file does not exist, you will either get an error or see a directory listing of the root directory, depending on how the Web server is configured.
My suggestion to all of you is that you come up with a naming convention for yourself now, and stick to it. This will avoid a lot of problems later on! For example, my naming convention is to use all lowercase letters, and to use underscores instead of spaces:
my_name.html
HTML Syntax
All HTML syntax is composed of discreet pieces of code called elements. Elements are made up of paired opening and closing tags.
Tags
Each tag has a specific meaning that communicates to the browse what it should do with the content between the opening and closing tag. For example, the <b></b> tag tells the browser to make bold all text contained between its opening and closing tags.
Tags are the cornerstone of HTML. Tags are instructions to the Web browser that dictate the display of text, images and other elements on the page and are not visible when the page is displayed to the user. You can recognize an HTML tag because it appears in between greater than and less than signs:
<tagname>
There is a large set of pre-designated tags within HTML. Today we are going to cover the basic tags needed for building a basic HTML page and formatting text.
There are two types of tags, container tags and non-container tags.
Container tags appear in pairs, as an opening tag and as a closing tag, like so:
<tagname> </tagname>
Everything contained between the opening <> and closing </> tags is subject to the tag properties.
Non-container tags appear singly, and are what is called “self-closing.” This means that they do not appear in sets, but only as a single tag. In this case, the page content affect by the tag is all contained within the single tag, like so:
<tagname tagcontent />
Note: Previous versions of HTML did not require the closing “/” character at the end of the non-container tag, and it will generally function correctly in most browsers without it, but for the specification we will be using as the standard for this class, you will need to include this.
Attributes
In the language of HTML, attributes serve to modify tags, much like an adjective modifies a noun. As the name implies, attributes are properties of the tag. Each tag has properties that can be changed via the use of the attributes that are associated with it. Attributes follow the tag name within a tags opening component, in between the greater than and less than signs, like so:
<tagname attributename=”value”>
The order of attributes is not important. You can place as many attributes inside a tag as is needed:
<tag attribute1=”value1″ attribute2=”value2″ attribute=”value3″>
Page Structure
In order for a Web browser to recognize a file as an HTML document, it must contain the proper structure. At the minimum, it must contain five basic tags. These tags must appear in the correct order. The page structure tags are as follows:
DOCTYPE tells the Web browser which HTML or XHTML standard your document is written to. For this class, you should useXHTML5 transitional. This is the first thing that should appear in any HTML document that you write.
<!DOCTYPE html>
Always use the code exactly as it appears above. If you would like to read more about DOCTYPE and its use, check out this article on DevGuru.
The <html> tag comes next. It encloses all other tags and content on the page, and further serves to instruct the browser that what is being rendered on the rest of the page. You should use this format for the html tag:
Third is the <head> tag which contains information that is not displayed in the browser window. For instance, a head tag may include information that search engines may use to find the page.
The <title> tag contains the text that appears in the title bar of the browser window. It is nested within the head tag.
The <body> tag contains all of the information to be displayed by the browser.
Using these tags, you can build a basic page structure:
<!DOCTYPE html>
<html>
<head>
<title>My First HTML Page</title>
</head>
<body>
Anything inside the body tags will appear on your Web page.
</body>
</html>
Use this template as the basis for all of your HTML pages!
Creating your own HTML pages with Text Editors
To make your own Web pages, start with the code above. HTML pages can be created in any Plain Text Editing application. DO NOT use Microsoft Word, as it will add extra formatting that will break your code. Here are links to several text editors that you can download and use to create your pages:
DOCUMENTS MUST HAVE LOGICAL STRUCTURE
All XHTML elements must be nested within the <html> root element. It is the element from which grows the document tree. All other elements can have sub (children) elements. Sub elements must be in pairs and correctly nested within their parent element. Within the html element there are two necessary “child” elements: the head element and the body element.
Logical Markup Example (Using semantic markup to describe content.)
<!DOCTYPE HTML PUBLIC "-//W3C//DTD HTML 4.0//EN"

"http://www.w3.org/TR/REC-html40/strict.dtd">

<html>

<head>
<title>Working with Structure</title>
</head>
<body>
<h1>Welcome</h1>
<p>Welcome to the site where structure matters!</p>
<h2>Getting Into Structure</h2>
<p>In order to begin working with structure, you need to be aware
of:</p>
<ul>
<li>DOCTYPE declarations</li>
<li>Properly structured head and body components</li>
<li>Logical structures for content markup</li>
</ul>
</body>

</html>
VIEWING THE DOCUMENT TREE
When you have a more semantic document, you can easily visualize it via the document tree, which is a map that reflects where elements go within the structural hierarchy of the document. This tree becomes critically important when using CSS because of the concept of inheritance.

Document root: html
- head & body are children to the root
- title is child to the parent head
- h1 , h2, p, ul all children of body
- Each li is a child to ul
-
ELEMENTS MUST BE PROPERLY NESTED
In HTML some elements can be improperly nested within each other like this:
<strong><em>This text is bold and italic</strong></em>In XHTML all elements must be properly nested within each other like this:
<strong><em>This text is bold and italic</em></strong>
TAG NAMES MUST BE IN LOWER CASE
This is because XHTML documents are XML applications. XML is case-sensitive. Tags like <p> and <P> are interpreted as different tags.
This is wrong:
<BODY>

<P>This is a paragraph</P>
</BODY>
This is correct:
<body>

<p>This is a paragraph</p>

</body>
ALL XHTML ELEMENTS MUST BE CLOSED
Non-empty elements must have an end tag.
This is wrong:
<p>This is a paragraph
This is correct:
<p>This is a paragraph</p>
Empty Elements Must also Be Closed
Empty elements must either have an end tag or the start tag must end with />.
This is wrong:
This is a break<br>
This is correct:
This is a break<br />
IMPORTANT Compatibility Note:
To make your XHTML compatible with today’s browsers, you should add an extra
space before the “/” symbol like this: <br />.
THE <!DOCTYPE> IS MANDATORY
An XHTML document consists of three main parts:
- the DOCTYPE
- the Head
- the Body
The XHTML standard defines three Document Type Definitions.
You must select a DOCTYPE and follow the guidelines of that DOCTYPE. The browser will attempt to render your page in standards-compiant mode, following the XHTML and CSS recommendations. If you don’t follow the DOCTYPE guidelines or don’t define a DOCTYPE at all or incorrectly the browser will enter “quirks mode” and render your pages as they might appear in an older browser.
The most common DOCTYPE is the XHTML Transitional.
<!DOCTYPE html PUBLIC "-//W3C//DTD XHTML 1.0 Transitional//EN"

"http://www.w3.org/TR/xhtml1/DTD/xhtml1-transitional.dtd">
Another DOCTYPE we will use is XHTML 1.0 Strict:
<!DOCTYPE html PUBLIC "-//W3C//DTD XHTML 1.0 Strict//EN" "

http://www.w3.org/TR/xhtml1/DTD/xhtml1-strict.dtd">
BASIC TAGS CONTINUED
Last week we introduced the basic page tags and the <p> tags. Today we are going to learn the rest of the most commonly used tags.
There are two types of HTML formatting tags: inline and block level tags. These two types have slightly different behaviors.
Inline tags
These tags are designed to enclose content that is part of another element. Generally they are used when you want to affect just part of the text in a paragraph. There are just two inline tags we are going to talk about today.
Bold text:
<strong></strong> or <b></b>
Italic text:
<em></em> or <i></i>
Line breaks:
This is a self-closing (non-container) tag. This will create a single line break wherever it is placed in the code:
<br />
Block level tags
These tags are used to control blocks of content. The main characteristic that differentiates block from inline is that block level elements appear by default with a line break before and after them. Here are the most common block level tags you will work with:
The six heading levels:
<h1>Heading 1</h1>
<h2>Heading 2</h2>
<Hh3>HEADING 3</h3>
<h4>Heading 4</h4>
<h5>Heading 5</h5>
<h6>Heading 6</h6>
Again, the paragraph tag:
<p></p>
LISTS
There are several tags that you can use to create a “list” of items which is a very important way of organizing content. When used in combination with CSS, lists are a great way to create navigation menus. The tags below are a little different than the tags above in that you must use two distinct tags to create the list, one that contains the entire list, and one that contains each item in the list. Let’s look at
There are three types of lists: unordered, ordered, and definition.
Unordered ListThis tag, enclosing all list content, creates a bulleted list.
The code:
<ul>
<li>apples
<li> oranges</li>
<li>pears</li>
</ul>
This is how the list would look:
This is a LIST with an a href which makes your list a LINK.
NOTE: Inside the <ul> or <ol> tages, you use a set of tags, enclosing each line, or “list item” item:
<li></li>
Unordered List
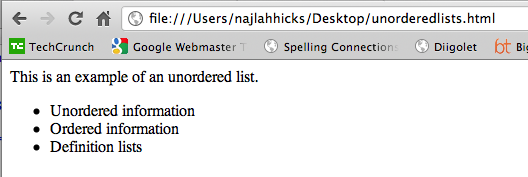
This is how it would look on the web.
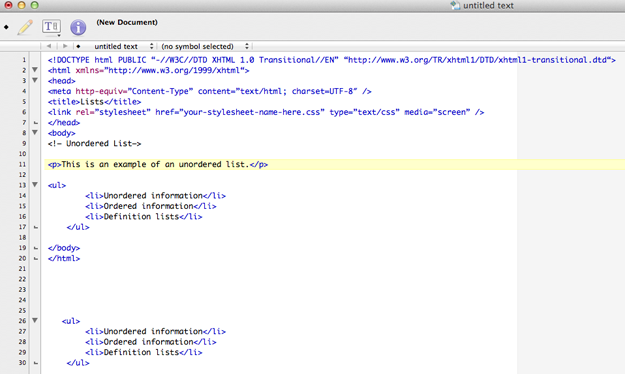
This is how it would look written in Text Wrangler.
This is the code you would use:
<p>This is an example of an unordered list.</p>
<ul>
<li>Unordered information</li>
<li>Ordered information</li>
<li>Definition lists</li>
</ul>
This tag, enclosing all list content, creates a numbered list:
<ol></ol>
To make an ordered list, like this:
- Monday
- Tuesday
- Wednesday
- Thursday
- Friday
Use this code:
<ol><li>Monday</li><li>Tuesday</li><li>Wednesday</li><li>Thursday</li><li>Friday</li></ol>
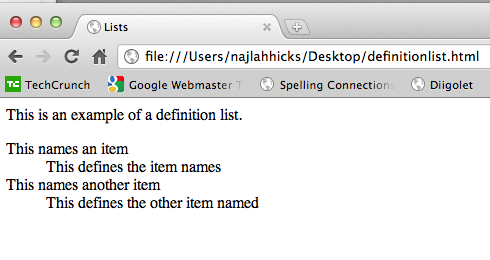
Definition ListThis tag involves a main phrase, and then a definition for that phrase that appears indented and appearing on a separate line.
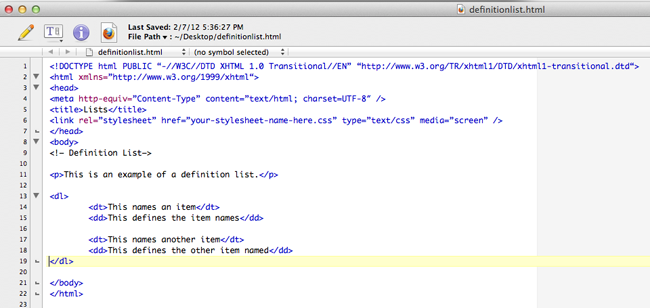
Use this code:
<dl>
<dt>This names an item</dt>
<dd>This defines the item names</dd>
<dt>This names another item</dt>
<dd>This defines the other item named</dd>
</dl>
To create an unordered list, like this:Use this code:
<ul>
<li>Unordered information</li>
<li>Ordered information</li>
<li>Definition lists</li>
</ul>
Common Link Types Link to launch a new window <a href=”newpage.html” target=”_blank”> Link to launch email application<a href=”mailto:myname@email.com”>
<a href=”mailto:myname@email.com”>email me now</a>
OR
<a href="mailto:someone@example.com?Subject=Hello%20again">
Send Mail</a>
When someone clicks on the the “Send Mail”, the email field will pop up.
Anchor Links to a specific place on the same page
<a name=”top”></a>
= an anchor must be indicated in a single, specific spot on the page
<a href=”#top “>Return to Top</a> = a link with “#” before the name that was applied to the anchor link specified in another part of the page.
Homework | Week 1
- Register as a user of this blog. Post a comment to this blog post to let me know that you are registered and include the address for your ”wordpress blog”. Each week following this you will post a link to your homework on your own WordPress blog in the comments section of this blog.
- Go to WordPress and create a blog that you will use to house your homework for this class. Under appearances, select themes and choose a new theme. Add widgets, fill out the personal info on the blog and create a blog that shows some personality.
- Create a del.icio.us account for yourself. Tag three Web Sites that you like or visit on a regular basis, and write a note about why you think each one is a well designed and effective site.
- Using the basic page template that you saved in class today, create an HTML page that contains a short bio of yourself. Bring this file to class with you next week, also, please post it on YOUR blog. Here is an example of a resume.
- Create an artist statement and resume for yourself as a text file (not HTML) and bring it to class next week – also, please post it on YOUR wordpress blog. Here is an example of an artist statement.
- Create a Gravatar account. Take a photo of yourself, upload it to Gravatar and link it to your WordPress blog using the email you used to create the blog.
- Add at least two LISTS to your resume markup.


Hi, this is a comment.
To delete a comment, just log in and view the post's comments. There you will have the option to edit or delete them.
http://burnham86.wordpress.com/
Here’s my WordPress professor:
http://katherinathompson.wordpress.com/
http://adewoleojo.wordpress.com/
ct 360
I found this first class assignment to be deja-vu. It took me back to when I first created a wordpress site for my professor Michael Branson Smith last semester for his Ds106 class. I am excited and I cant wait to design!
http://julliehusclarkeclayton.wordpress.com
https://delicious.com/katherinathompson
https://delicious.com/burnham86
https://en.gravatar.com/chadburnham86
2nd Comment:
Hello
This is my https://delicious.com/somethingtoosee account url.
http://tbennettweb1.wordpress.com/about/
artist profile
http://burnham86.wordpress.com/2012/09/19/artist-profile/